
This article will provide a guideline on the tools and woods required to carve spoons. You will also learn some of the techniques required to carve spoons. A leather scraper is a tool that can be used to roll a knife. The leather scraper doubles as both a blade and a rolling pin. The tips and tricks outlined in this article will help you make the most beautiful spoons possible.
Wooden spoon carving
Maple is a good choice for novice spoon carvers. The soft wood is easy to obtain and has a pleasant grain. It is also very soft compared to basswood and lends a sweet fragrance to the air. Try silver maple for your first carving job. Or, you could use any other hardwood such as walnut, cherry or hickory. Once you've decided on the design, trace it using a pencil and cut it out with a spoon carving knife.
First, select the wood you want to use for your spoon. If you choose a hardwood like maple, you'll need a scrap piece of wood around four inches long. This will help prevent wood from drying out. A good piece is one that has few chips. It will look just like a finished spoon. To help you with your carving, you can purchase templates online. You can also cut your own scrap pieces of wood if you don't already have one.
Tools
To begin spoon carving, you will need a few tools. An essential tool for spoon carving is the axe. They will help you shape the spoon. Gransfors Bruks Wildlife Hatchet is a good choice. It's lightweight, has a suited edge geometry, and is exemplary quality. You may also consider a bandsaw if you are feeling more adventurous. A spoon gauge is useful to determine the depth of your carvings before you proceed.

Drawing out the spoon's shape is the first step to carving it. A simpler shape is easier to carve. Therefore, a straight handle can help you achieve the desired shape. To cut the desired shape, you can use a template. To hollow out the bowl of a spoon, you will need a knife or a gouge. This will require you to start on the southern side and work towards the northern end.
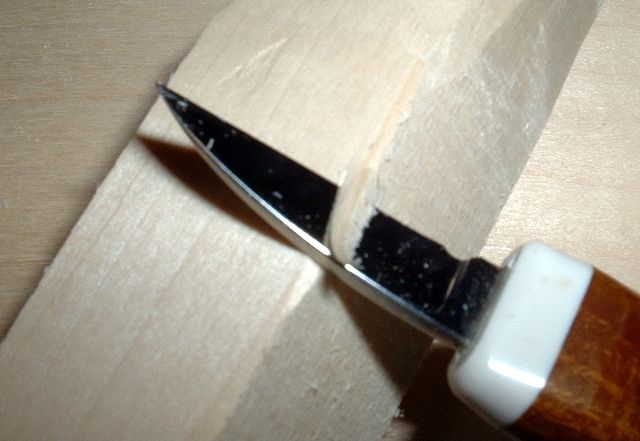
Techniques
Maple is an excellent choice for beginners to learn how to carve. Maple is a soft hardwood, easy to source and gives off a sweet aroma. It is easier to carve maple than basswood and other softwoods. In no time you will be carving stunning spoons after learning how to carve Maple. Once you've mastered the basics, you can move on to harder woods such as oak and ash.
The first step in the carving process is to rough out the bowl with the gouge. For a smooth, even surface, work on the convex side of the spoon. Round out the head by removing any material around the edges. If you're new in spoon carving, you might use a round sweep gouge to shape the spoon's surface. This will avoid cracking or chipping the wood.
Woods to use
For beginners, you can choose pine or basswood as the wood to carve a wooden spoon. The waste chunk can be removed to save money. You can also carve spoons from oak, aspen and cocobolo. However, these woods are allergenic. These woods have large pores that are able to absorb oil, which can cause them to go rancid. It is best to avoid woods such as oak, cocobolo and aspen for beginners, as they can be very difficult to carve.
Butternut and Basswood are the best woods to carve spoons from. They are both sturdy and soft and are perfect for holding details. If you live close to a forest, you may also want to ask tree-trimmers for wood. Some woods can be used to make spoons, and power companies may even cut down trees. Regardless of wood type, you should choose a piece of wood that is straight-grained and free of knots.
Steps to carve a spoon
Preparing wood is the first step in carving a spoon. You can smoothen the edges of the wood using a carving gouge or chisel. A mallet can be used to break the wood if you do not own one of these tools. You should leave enough wood on the spoon's end to allow you to hold it while you carve. You can also use a saw to make angle cuts following the shape of the bowl.
Next, shape the bowl using a chisel. Begin at the top of the bowl, and work your way down to the tail. Once you are happy with the overall shape of the bowl and handle, you can use a carving knife to refine its shape. Use your thumb to leverage and not cut too deeply. After shaping the handle, you can round out the spoon's appearance by rounding it.
FAQ
Is it possible to open my own woodworking shop?
It is difficult to start your own woodworking company. There are lots of legal requirements and regulations that you'll need to follow. But, this doesn't mean you need to go through all of the trouble of setting up your business. Many people prefer to join existing companies. This way, you only need to pay membership fees and taxes.
How can I learn basic woodworking skills
The best way to learn how furniture construction is to make your own bench. This project can be completed with whatever wood you have available at home. If you're not sure which kind of wood to choose, you can purchase cheap pine boards at Lowes and Home Depot. Once you have built your bench, you will need to sand it off and then finish it with a stain/varnish.
Where to Buy Hardwood Lumber?
Home Depot has hardwood lumber for sale. They offer a wide range of wood products including flooring, cabinets, furniture and more.
A large variety of engineered hardwoods is available to them, including Ipe (Araucaria Angustifolia), Brazilian Cherry and Peau d'Arco.
These woods are available online by searching Google for "hardwood lumber".
How does a beginner woodworker earn money?
Many people want to open an online furniture business and are learning how to build it. However, if you're just getting into furniture building, there are other options than selling on Etsy. You could sell at craft fairs or local events. For those who want to build their own furniture, you might offer workshops. If you have the experience to be a carpenter, builder, or a designer, you may consider offering your services in remodeling homes or creating custom pieces.
What's the difference between plywood vs particle board?
Plywood is made of layers of wood that are pressed together under pressure. Plywood comes with a range of thicknesses, and it is most commonly used for flooring and cabinets. Particle board consists of sawdust mixed and resin. The resin is then compressed into large blocks. It's used for home improvement projects. Both boards can be cut easily and are both durable.
Statistics
- The best-paid 10 percent make $76,000, while the lowest-paid 10 percent make $34,000. (zippia.com)
- The U.S. Bureau of Labor Statistics (BLS) estimates that the number of jobs for woodworkers will decline by 4% between 2019 and 2029. (indeed.com)
- Overall employment of woodworkers is projected to grow 8 percent from 2020 to 2030, about as fast as the average for all occupations. (bls.gov)
- In 2014, there were just over 237,000 jobs for all woodworkers, with other wood product manufacturing employing 23 percent; wood kitchen cabinets and countertop manufacturing employing 21 percent. (theartcareerproject.com)
External Links
How To
How to join wooden boards without using nails
Woodworking is a favorite hobby. It is relaxing and enjoyable because you can create something useful with wood. Sometimes you may want to join two pieces together of wood without using nails. This article will teach you how to do this to keep your woodwork projects looking great.
Before joining the pieces of wood together, you will need to first trim any edges. You don't want any sharp corners to cause problems later. Once you've done this, you're ready to start gluing your boards together.
You should only glue one side of hardwood. You should glue both sides if you are working with softwoods such as pine and cedar. Apply the glue to the boards and press them down until they are securely attached. Before moving onto the next step, make sure the glue has dried completely.
After you glue your boards together, drill holes at the joints where screws will be inserted. These holes will differ depending on the type and size of screw you are using. For example, if you intend to use 1/2-inch wood screws, you need to drill a hole that is at most 3/4 inches deep.
Once you have drilled the holes, the next step is to drive your screws through the joint into the board's backside. Avoid hitting the board's top surface. Otherwise, you could ruin the finish. Be careful not to drive the screws too hard at the ends. This will prevent splitting in the end grain of the wood.
Protect your finished project now. You have two options: seal the whole furniture piece or just the top. You will want to choose a product that will be durable for many years. There are many options: oil-based varnishes; polyurethane; shellac; lacquer.
These products can usually be found at any home improvement store. You should make sure you are getting the right type for the job. Some finishes are toxic and should not ever be used indoors. When handling certain finishes, wear protective gear.